SACHS shock absorbers for passenger cars:
enhanced safety and driving comfort.
SACHS shock absorbers are of the highest quality, which is one reason why numerous well-known automotive manufacturers fit them as standard in new vehicles. Every year, over 10 million new cars roll off the assembly line fitted with SACHS products. Equally, SACHS applies its OE expertise to spare parts production, so its aftermarket shock absorbers are always state-of-the-art, which means a safer, more comfortable and contemporary drive. No matter what challenges the road presents, the chassis performance and dynamics they provide ensure perfect road grip and cornering.
Types of shock absorbers
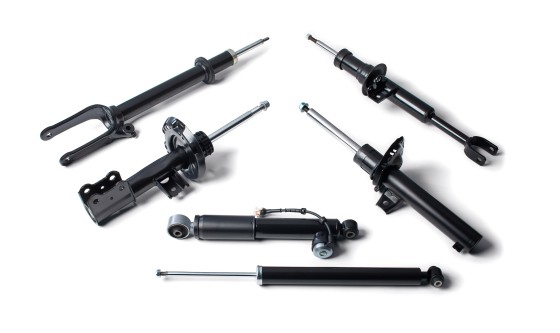
SACHS has a shock absorber for every requirement, e.g. monotube and twin-tube dampers, suspension struts, spring carriers (shock absorbers with spring plate) and suspension cylinders (shock absorbers with hydraulic leveling system). A special product highlight is the SACHS lightweight aluminum shock absorber, which combines the effects of several lightweight design measures. The shock absorber reservoir tube features a variable wall thickness for guaranteed strength where high loads occur. The other areas are designed as thin as possible in order to save weight. Volume production of this high-tech product is based on a complex procedure that generates the different wall thicknesses in up to 17 coordinated process steps. Besides shock absorbers, SACHS employs lightweight design in its suspension struts.
Monotube dampers
In gas-filled monotube dampers, the working cylinder is filled with oil and gas at a high pressure of around 25 to 30 bar. The floating separating piston provides absolutely leakproof separation between the oil and the gas.
The SACHS monotube damper can be installed in any position. It operates at higher pressure than the twin-tube damper. The advantages of this are that it makes the lamellar valves in the piston highly responsive and also prevents foaming or bubble formation in the hydraulic oil.

1. Mounting joint
2. Piston rod guide
3. Piston rod seal
4. Piston rod
5. Protective tube
6. Piston valve
7. Working cylinder
8. Separating piston
9. Gas cavity
10. Mounting joint
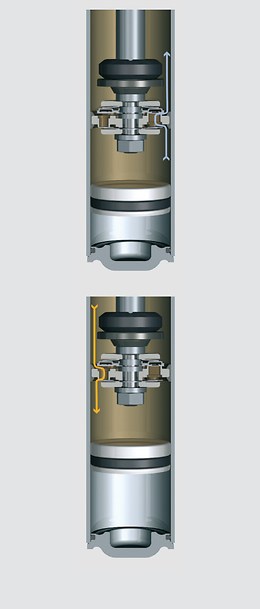
Compression stage
Vehicle vibrations push the shock absorber together.
The piston valve provides resistance against the oil that flows up from the cavity below the piston. This slows the downstroke.
The gas cushion compresses by the volume of the retracting piston rod.
Rebound stage
Vehicle vibrations pull the shock absorber apart.
The piston valve provides resistance against the oil that flows down from the cavity above the piston. This slows the upstroke.
The gas cushion expands by the volume of the extending piston rod.
Twin-tube dampers
Twin-tube dampers have two oil-filled cavities: the working cavity in which the piston and piston rod move, and the compensating cavity. The compensating cavity is located between the working cylinder and the reservoir tube, and is filled 2/3 with oil and 1/3 with air or gas. As a result, the twin-tube damper has a shorter installation length than its monotube equivalent.
The damping force characteristics of the twin-tube damper are specifically designed for each vehicle type in that they are adapted to the vehicle weight, axle design and suspension springs.
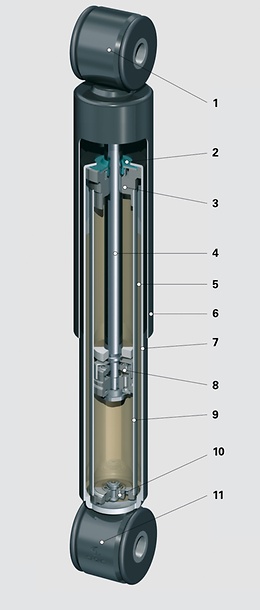
1. Mounting joint
2. Piston rod seal
3. Piston rod guide
4. Piston rod
5. Compensating cavity
6. Protective tube
7. Reservoir tube
8. Piston valve
9. Working cylinder
10. Bottom valve
11. Mounting joint
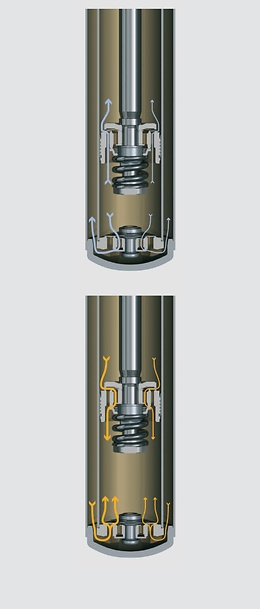
Compression stage
Vehicle vibrations push the shock absorber together, with the bottom valve determining the damping.
The oil displaced by the retracting piston rod flows into the compensating cavity, where the bottom valve resists this flow and thus slows down the stroke.
The piston valve is open. In this state it functions as a non-return valve.
Rebound stage
Vehicle vibrations pull the shock absorber apart, with the bottom valve determining the damping.
The piston valve provides resistance against the oil that flows down from the cavity above the piston. This slows the upstroke.
Via the open non-return valve in the bottom valve, the oil required back in the working cavity can flow unobstructed out of the compensating cavity.
Shock absorbers damp vibrations in the suspension springs and thus in the vehicle body
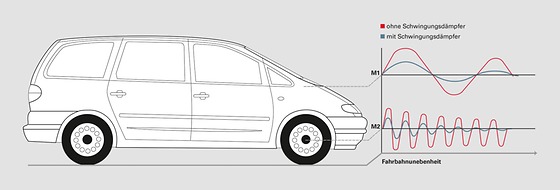
A passenger car shock absorber, together with the spring, forms the end link between the suspension and the vehicle body. It is a vital safety-related component that reduces vibrations in the suspension spring, slowing it down and thus reducing vehicle body movement. The term “shock absorber” is therefore actually misleading - strictly speaking, it’s a “vibration absorber”.
The impact of driving over uneven ground is absorbed by the suspension. It prevents the sprung masses (M2 = vehicle body and payload) from coming into contact with the unsprung masses (M1 = axle and wheels). Following compression, the suspension springs attempt to push the sprung masses away from the unsprung masses. The shock absorbers allow the resulting axle and body vibrations to subside.